-
Metal 둘러보기Apple🍎/Metal 2025. 3. 21. 22:37
셰이더(shader)는 무엇인가?
다음은 애플 디벨로퍼 홈페이지에 있는 Metal 의 소개입니다. 일단 Metal 을 사용하면 GPU 프로그래밍을 가능하게 해준다고는 들었는데, 셰이딩 언어는 또 뭘까요? 사실 GPU(Graphics Processing Unit)는 그
people-analysis.tistory.com
Metal에 대해 알아보기전에 그래픽 렌더링과 GPU의 발전 역사를 먼저 살펴보시면 다음에 나올 용어들에 익숙해져 내용 이해에 도움이 됩니다.
소개
애플의 Metal 프레임워크는 iOS, macOS, tvOS 기기에서 GPU를 직접 제어할 수 있는 저수준 그래픽 API입니다. 2014년에 처음 소개된 이후, Metal은 애플 플랫폼에서 OpenGL을 대체하며 최신 그래픽 및 컴퓨팅 작업을 위한 핵심 기술로 자리잡았습니다.
Metal이 특별한 이유는 다음과 같습니다:
- 낮은 오버헤드: CPU 사용량을 최소화하여 그래픽 처리 성능을 극대화합니다.
- 통합된 API: 그래픽 렌더링과 일반 컴퓨팅(GPGPU) 작업을 하나의 API로 통합했습니다.
- 하드웨어 최적화: 애플의 A 시리즈와 M 시리즈 칩에 최적화되어 있습니다.
- 현대적 설계: 멀티스레딩과 병렬 처리를 기본적으로 지원합니다.
기본 개념
1. 디바이스와 명령 큐
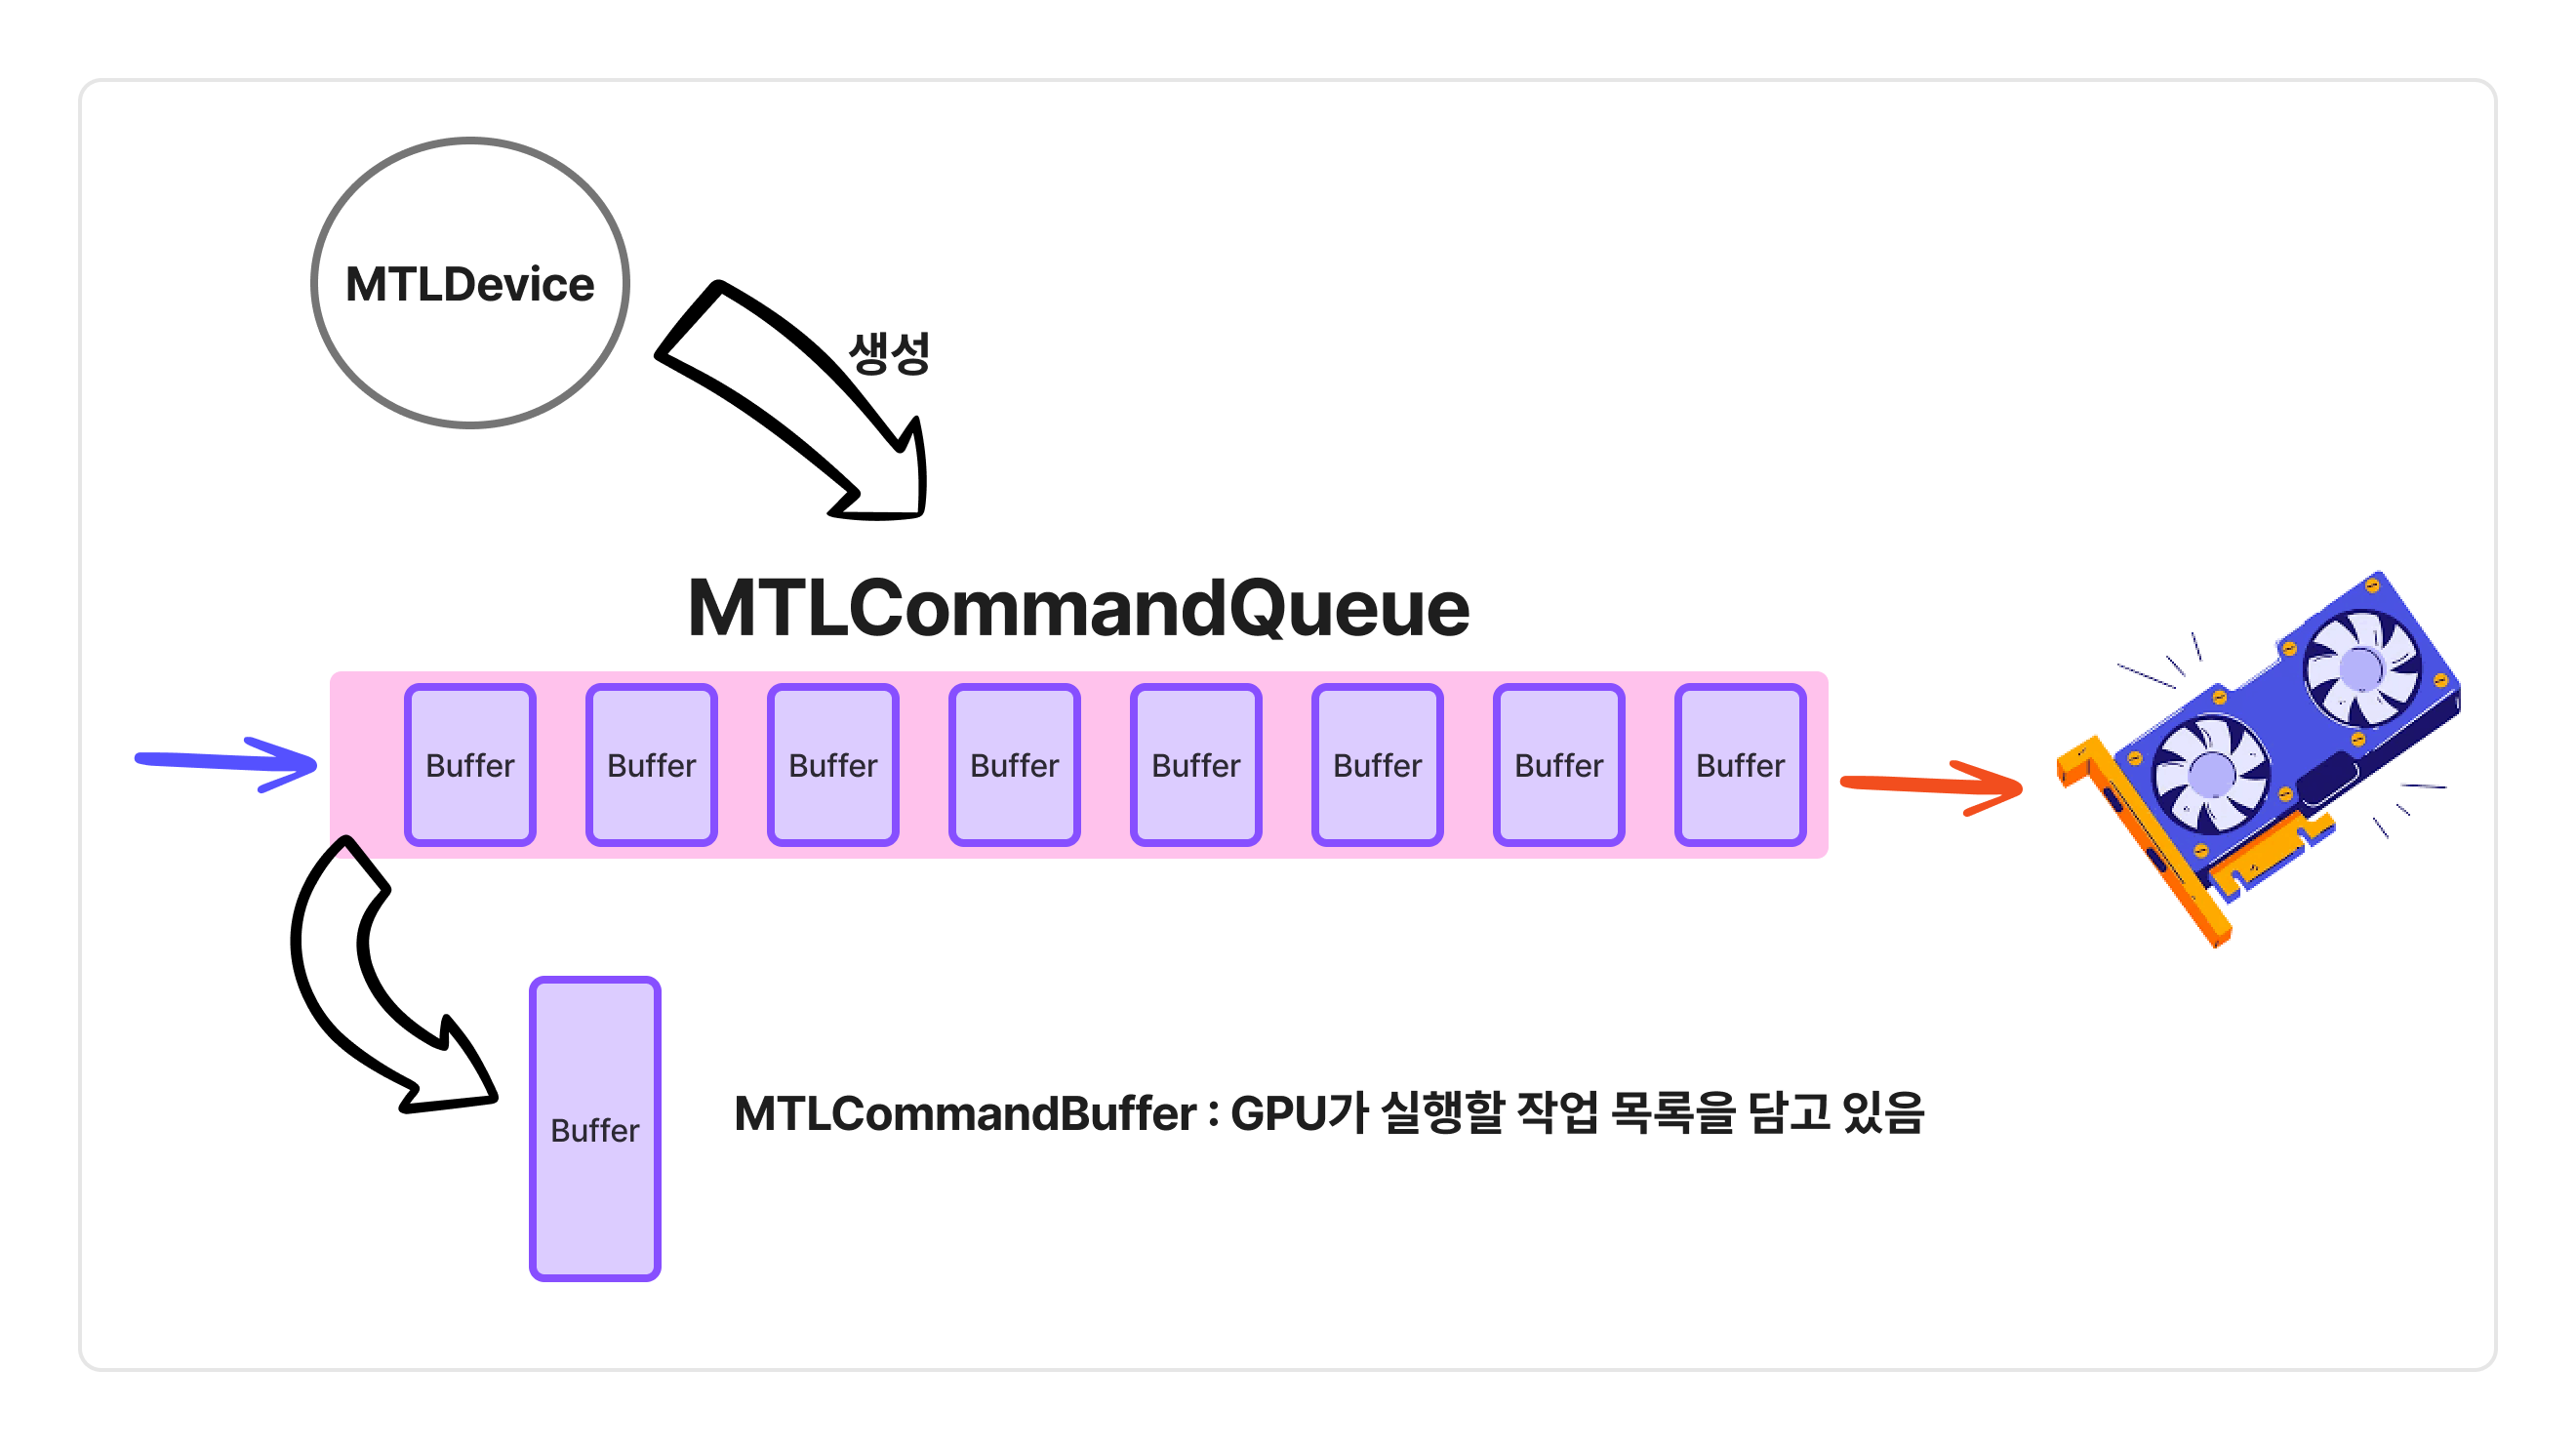
Metal의 모든 작업은 물리적 GPU를 나타내는 MTLDevice 객체를 통해 시작됩니다. 이 디바이스는 명령 큐(MTLCommandQueue)를 생성하며, 이 큐를 통해 GPU에 실행할 명령을 전달합니다.
// GPU 디바이스 가져오기
let device = MTLCreateSystemDefaultDevice()!

// 명령 큐 생성
let commandQueue = device.makeCommandQueue()!
명령 큐는 FIFO(First In, First Out) 방식으로 작동하며, 명령 버퍼(MTLCommandBuffer)를 순서대로 처리합니다. 각 명령 버퍼는 GPU가 실행할 작업 목록을 담고 있습니다.
2. 버퍼와 텍스처
Metal에서 데이터를 다루는 두 가지 주요 방법은 버퍼와 텍스처입니다.
- 버퍼(MTLBuffer): 구조화되지 않은 메모리 블록으로, 주로 정점 데이터, 인덱스, 균일 변수(uniform variables) 등을 저장합니다.
- 텍스처(MTLTexture): 이미지 데이터를 저장하는 구조화된 메모리로, 렌더링 대상이나 셰이더 입력으로 사용됩니다.
// 정점 데이터를 위한 버퍼 생성
let vertices = [...] // 정점 배열
let vertexBuffer = device.makeBuffer(bytes: vertices, length: vertices.count * MemoryLayout<Vertex>.stride, options: [])

// 텍스처 생성
let textureDescriptor = MTLTextureDescriptor.texture2DDescriptor(
    pixelFormat: .rgba8Unorm,
    width: 512,
    height: 512,
    mipmapped: true
)
let texture = device.makeTexture(descriptor: textureDescriptor)!
3. 셰이더
셰이더는 GPU에서 실행되는 작은 프로그램으로, Metal Shading Language(MSL)로 작성됩니다. MSL은 C++를 기반으로 한 언어로, 다음과 같은 주요 셰이더 타입이 있습니다.
- 정점 셰이더(Vertex Shader): 3D 공간의 정점 위치를 화면 좌표로 변환합니다.
- 프래그먼트 셰이더(Fragment Shader): 각 픽셀의 최종 색상을 결정합니다.
- 컴퓨트 셰이더(Compute Shader): 일반적인 병렬 계산을 수행합니다.
// 간단한 정점 셰이더 예제
vertex VertexOutput vertexShader(uint vertexID [[vertex_id]],
                                constant Vertex *vertices [[buffer(0)]]) {
    VertexOutput output;
    output.position = float4(vertices[vertexID].position, 0.0, 1.0);
    output.color = vertices[vertexID].color;
    return output;
}

// 간단한 프래그먼트 셰이더 예제
fragment float4 fragmentShader(VertexOutput input [[stage_in]]) {
    return input.color;
}
셰이더는 .metal 파일에 작성되며, Xcode는 이를 컴파일하여 애플리케이션에 포함합니다.
4. 렌더 패스와 컴퓨트 패스
Metal에서 작업 처리는 주로 두 가지 패스를 통해 이루어집니다.
- 렌더 패스: 3D 모델이나 2D 이미지를 화면이나 텍스처에 그리는 과정입니다.
- 컴퓨트 패스: 그래픽과 관련 없는 병렬 계산을 수행합니다.
각 패스는 해당 인코더(MTLRenderCommandEncoder 또는 MTLComputeCommandEncoder)를 통해 명령 버퍼에 기록됩니다.
Metal 파이프라인
Metal에서는 두 가지 주요 파이프라인이 있습니다. 그래픽 렌더링 파이프라인과 컴퓨트 파이프라인입니다.
1. 그래픽 렌더링 파이프라인
그래픽 렌더링 파이프라인은 3D 모델이나 2D 이미지를 화면에 그리는 과정을 정의합니다. 이 파이프라인은 다음 단계로 구성됩니다:
- 정점 처리(Vertex Processing): 정점 셰이더가 각 정점의 위치와 속성을 처리합니다.
- 기본 도형 조립(Primitive Assembly): 정점들이 삼각형 등의 기본 도형으로 조립됩니다.
- 래스터화(Rasterization): 기본 도형이 화면의 픽셀로 변환됩니다.
- 프래그먼트 처리(Fragment Processing): 프래그먼트 셰이더가 각 픽셀의 최종 색상을 결정합니다.
- 출력 병합(Output Merger): 깊이 테스트, 스텐실 테스트, 블렌딩 등이 수행되어 최종 이미지가 생성됩니다.
// 그래픽 렌더링 파이프라인 상태 생성
let pipelineStateDescriptor = MTLRenderPipelineDescriptor()
pipelineStateDescriptor.vertexFunction = vertexFunction
pipelineStateDescriptor.fragmentFunction = fragmentFunction
pipelineStateDescriptor.colorAttachments[0].pixelFormat = .bgra8Unorm

let pipelineState = try! device.makeRenderPipelineState(descriptor: pipelineStateDescriptor)
2. 컴퓨트 파이프라인
컴퓨트 파이프라인은 그래픽스와 관련 없는 병렬 계산을 위한 것으로, 더 단순한 구조를 가집니다. 컴퓨트 셰이더가 스레드 그룹 단위로 실행되며, 각 스레드는 독립적인 데이터를 처리합니다.
// 컴퓨트 파이프라인 상태 생성
let computeFunction = defaultLibrary.makeFunction(name: "computeShader")!
let computePipelineState = try! device.makeComputePipelineState(function: computeFunction)
3. 데이터 흐름
Metal에서 데이터 흐름은 일반적으로 다음과 같은 순서로 진행됩니다.
- CPU에서 버퍼와 텍스처에 데이터를 기록합니다.
- 명령 버퍼를 생성하고 인코더를 통해 명령을 기록합니다.
- 명령 버퍼를 커밋하여 GPU에 제출합니다.
- GPU가 명령을 실행하고 결과를 메모리에 기록합니다.
- 필요한 경우 CPU가 결과 데이터를 읽습니다.
// 데이터 흐름의 예
let commandBuffer = commandQueue.makeCommandBuffer()!

// 렌더 패스 설정 및 인코딩
let renderEncoder = commandBuffer.makeRenderCommandEncoder(descriptor: renderPassDescriptor)!
renderEncoder.setRenderPipelineState(pipelineState)
renderEncoder.setVertexBuffer(vertexBuffer, offset: 0, index: 0)
renderEncoder.drawPrimitives(type: .triangle, vertexStart: 0, vertexCount: 3)
renderEncoder.endEncoding()

// 완료 핸들러 설정
commandBuffer.addCompletedHandler { _ in
    print("렌더링 완료!")
}

// GPU에 제출
commandBuffer.commit()
4. 동기화
Metal은 다양한 동기화 메커니즘을 제공합니다.
- 명령 버퍼 완료 핸들러: 명령 버퍼 실행이 완료되면 호출되는 콜백 함수입니다.
- 리소스 배리어(Resource Barriers): 특정 리소스에 대한 작업이 완료될 때까지 기다립니다.
- 울타리(Fences): 여러 명령 버퍼 간의 의존성을 관리합니다.
간단한 Metal 애플리케이션 예제
다음은 삼각형을 그리는 간단한 Metal 애플리케이션의 핵심 코드입니다:
import Metal
import MetalKit

class TriangleRenderer: NSObject, MTKViewDelegate {
    let device: MTLDevice
    let commandQueue: MTLCommandQueue
    let pipelineState: MTLRenderPipelineState
    let vertexBuffer: MTLBuffer

    init(mtkView: MTKView) {
        // 디바이스 및 명령 큐 설정
        device = MTLCreateSystemDefaultDevice()!
        commandQueue = device.makeCommandQueue()!

        // Metal 뷰 설정
        mtkView.device = device
        mtkView.clearColor = MTLClearColor(red: 0.0, green: 0.0, blue: 0.0, alpha: 1.0)

        // 정점 데이터 생성
        let vertices: [Float] = [
             0.0,  0.5, 0.0,    // 상단 정점
            -0.5, -0.5, 0.0,    // 좌측 하단 정점
             0.5, -0.5, 0.0     // 우측 하단 정점
        ]
        vertexBuffer = device.makeBuffer(bytes: vertices, length: vertices.count * MemoryLayout<Float>.size, options: [])!

        // 셰이더 로드
        let library = device.makeDefaultLibrary()!
        let vertexFunction = library.makeFunction(name: "vertexShader")!
        let fragmentFunction = library.makeFunction(name: "fragmentShader")!

        // 파이프라인 상태 생성
        let pipelineDescriptor = MTLRenderPipelineDescriptor()
        pipelineDescriptor.vertexFunction = vertexFunction
        pipelineDescriptor.fragmentFunction = fragmentFunction
        pipelineDescriptor.colorAttachments[0].pixelFormat = mtkView.colorPixelFormat

        pipelineState = try! device.makeRenderPipelineState(descriptor: pipelineDescriptor)

        super.init()
        mtkView.delegate = self
    }

    // MTKViewDelegate 메서드
    func draw(in view: MTKView) {
        guard let renderPassDescriptor = view.currentRenderPassDescriptor,
              let drawable = view.currentDrawable else { return }

        let commandBuffer = commandQueue.makeCommandBuffer()!

        let renderEncoder = commandBuffer.makeRenderCommandEncoder(descriptor: renderPassDescriptor)!
        renderEncoder.setRenderPipelineState(pipelineState)
        renderEncoder.setVertexBuffer(vertexBuffer, offset: 0, index: 0)
        renderEncoder.drawPrimitives(type: .triangle, vertexStart: 0, vertexCount: 3)
        renderEncoder.endEncoding()

        commandBuffer.present(drawable)
        commandBuffer.commit()
    }

    func mtkView(_ view: MTKView, drawableSizeWillChange size: CGSize) {
        // 뷰 크기 변경 시 호출됨
    }
}
그리고 이 코드에서 사용된 셰이더는 다음과 같습니다.
#include <metal_stdlib> using namespace metal; // 정점 셰이더 vertex float4 vertexShader(uint vertexID [[vertex_id]], constant float3* vertices [[buffer(0)]]) { return float4(vertices[vertexID], 1.0); } // 프래그먼트 셰이더 fragment float4 fragmentShader() { return float4(1.0, 0.0, 0.0, 1.0); // 빨간색 }'Apple🍎 > Metal' 카테고리의 다른 글
cellular automata: 간단한 모래 시뮬레이터 만들기 (0) 2025.03.24 cellular automata(세포 자동자)는 뭘까? (0) 2025.03.23 셰이더(shader)는 무엇인가? (0) 2025.03.20 버텍스 노멀과 평균 노멀 : 빛을 어떻게 받는지 결정 (0) 2025.03.18 3D 모델링 기초 : 삼각형으로 일단 쪼개 보자 (0) 2025.03.17