-
[Swift] Property 제대로 써보자.Apple🍎/Swift 2023. 12. 12. 15:22
간단한 함수를 계산 프로퍼티로 바꿔보자.
계산 프로퍼티(computed properties)는 겉보기에 인스턴스의 속성 값을 들고 있는 일반 프로퍼티처럼 보인다.
하지만 실제로는 계산 프로퍼티는 어떠한 값도 내부에 저장하지 않고 함수처럼 기능한다.예를 들어
cookingTimer라는 객체를 만들고cookingTimer안에는 남은 시간을 나타내는secondsRemaining이라는 프로퍼티를 만들었다고 하자. 이 프로퍼티의 값을 get 해보면 다음과 같이 프로퍼티 값이 계속 변경되는 것을 볼 수 있다.cookingTimer.secondsRemaining // 409 // wait a bit cookingTimer.secondsRemaining // 404 // wait a bit cookingTimer.secondsRemaining // 392-> 이 property의 값이 계속 바뀌는 이유는 computed Property는 함수이기 때문이다.
이렇게만 해서는 어떻게 property가 함수처럼 기능할 수 있는지 잘 감이 오지 않는다.
struct의 함수를 계산 프로퍼티로 바꾸는 과정을 통해 “왜 계산 프로퍼티가 함수인지”를 알아보자.다음과 같이 Run이라는 struct이 있고 Run의 프로퍼티로는 id, 시작시간, 종료시간이 있다.
elsapsedTime( ): 경과된 시간을 계산하는 함수mutating func setFinished( ): nil인 endTime값을 호출된 시각으로 set하는 함수 ( struct는 내부의 프로퍼티 값을 메서드를 통해 수정하는 것이 불가능하다. mutating 키워드가 필요하다.)isFinished( ):setFinished( )함수로 인해 endTime 값이 들어온 순간 true가 되어 끝여부를 알려주는 함수
import Foundation

struct Run {
    let id: String
    let startTime: Date
    var endTime: Date?

    func elapsedTime() -> TimeInterval {             // 시작시각 ~ 현재시각 (경과된 시간)
         return Date().timeIntervalSince(startTime)
    }

    func isFinished() -> Bool {                      // 끝 여부
         return endTime !=  nil                         // endTime이 값이 setting 되면 true
    }

    mutating func setFinished() {.               // endTime setting
        endTime = Date()
    }

    init(id: String, startTime: Date) {
        self.id = id
        self.startTime = startTime
        self.endTime = nil
    }
}
elapsedTime( )과isFinishied( )를 살펴보면 파라미터가 없이 값만 반환하고 있다.이렇게 작성하고자 하는 메서드가 파라미터 없이 다른 일반 프로퍼티들을 이용해 계산한 값을 반환하고 있다면 이러한 메서드들은 computed property로 바꿀 수 있다.
struct Run { let id: String let startTime: Date var endTime: Date? var elapsedTime: TimeInterval { 1 return Date().timeIntervalSince(startTime) } var isFinished: Bool { 2 return endTime != nil } mutating func setFinished() { endTime = Date() } init(id: String, startTime: Date) { self.id = id self.startTime = startTime self.endTime = nil } }- 이제 함수를 호출하는 대신 계산 프로퍼티에 접근하는 것으로 원하는 값을 얻을 수 있다.
var run = Run(id: "10", startTime: Date())
// Check the elapsed time.
print(run.elapsedTime()) // 0.00532001256942749
// Check the elapsed time again.
print(run.elapsedTime()) // 14.00762099027634
run.setFinished() // Finish the exercise.
print(run.isFinished()) // true
var run = Run(id: "10", startTime: Date()) print(run.elapsedTime) // 30.00532001256942749 print(run.elapsedTime) // 34.00822001332744283 print(run.isFinished) // false계산시 시간을 잡아먹는 로직이 있다면 lazy 프로퍼티를 이용하자.
다음은 LearningPaln struct에는 computed property로 contents가 있다.
이 contents 내부에는 사용자 레벨에 따라 사용자 맞춤 contents를 선택하는 로직이 들어가 있으며 해당 로직은 시간을 많이 잡아먹는다고 해보자.struct LearningPlan { let level: Int var description: String // contents is a computed property. var contents: String { // 사용자 전용 컨텐츠를 요청하는 알고리즘 print("I'm taking my sweet time to calculate.") sleep(2) // t시간이 걸림 switch level { case ..<25: return "Watch an English documentary." case ..<50: return "Translate a newspaper article to English and transcribe one song." case 100...: return "Read two academic papers and translate them into your native language." default: return "Try to read English for 30 minutes." } } }이후 LearingPlan의 인스턴스를 만들고 계산 프로퍼티를 연속으로 get 해보면
get 할때마다 computed property의 내부 연산이 실행되는 것을 알 수 있다.
따라서 연산내에 시간을 잡아먹는 로직이 있다면 computed property를 사용하는 것이 바람직하지 않다.var plan = LearningPlan(level: 18, description: "A special plan for today!") print(Date()) // A start marker for _ in 0..<5 { plan.contents } print(Date()) // An end marker // 2018-10-01 06:39:37 +0000 // I'm taking my sweet time to calculate. // I'm taking my sweet time to calculate. // I'm taking my sweet time to calculate. // I'm taking my sweet time to calculate. // I'm taking my sweet time to calculate. // 2018-10-01 06:39:47 +0000이러한 경우에는 다음과 같이 계산 프로퍼티 대신 lazy 프로퍼티를 이용할 수 있다.
struct LearningPlan { let level: Int var description: String lazy var contents: String = { // Smart algorithm calculation simulated here print("I'm taking my sweet time to calculate.") sleep(2) switch level { case ..<25: return "Watch an English documentary." case ..<50: return "Translate a newspaper article to English and transcribe one song." case 100...: return "Read two academic papers and translate them into your native language." default: return "Try to read English for 30 minutes." } }() // ( ) 추가됨 }- lazy property closure 내부에서 다른 property 값을 참조할 수 있다.
- lazy property는 계산 프로퍼티와 달리 일반 프로퍼티로 취급되기 때문에 컴파일러는 해당 프로퍼티에 대해 초기화를 요구한다. lazy property를 제외한 커스텀 init을 작성하여 이를 피할 수 있다.
struct LearningPlan {
    // ... snip
    init(level: Int, description: String) { // no contents to be found here!
        self.level = level
        self.description = description
    }
}
접근할 때마다 계산을 다시 수행하던 계산 프로퍼티와 다르게
lazy property는 처음 접근시에만 계산을 수행하고 결과값을 저장한다. 이후 접근시 저장하고 있는 값을 내준다. 이로써 시간을 잡아먹던 로직을 반복해서 실행하는 것을 피할 수 있게 되었다.print(Date()) for _ in 0..<5 { plan.contents } print(Date()) // Will print: // 2018-10-01 06:43:24 +0000 // 'm taking my sweet time to calculate. // 2018-10-01 06:43:26 +0000lazy property의 외부 set을 막자.
lazy property를 쓸때 주의할 점이 있다. 바로 set을 통해 외부에서 값을 세팅할 수 있다는 것이다.
외부에서 값을 세팅하게 되면 클로저를 이용 일정한 로직을 이용해 값을 연산후 저장하는 lazy property의 특징을 살려서 사용할 수가 없다. 따라서 lazy property의 외부 접근을 통한 set을 막기 위해서private(set)을 사용하자.struct LearningPlan { lazy private(set) var contents: String = { // ... snip }private(set)은 해당 프로퍼티에 대해 get으로 접근은 가능하지만 set으로 변경은 불가능하게 한다.
struct 인스턴스를 다른 변수에 할당하고 싶으면 lazy property가 세팅되지 않은 상태로 넘겨라.
lazy property를 처음 접근하여 클로저를 통해 값이 저장된 이후에는 이 값을 바꿀 수가 없다.
구조체에서 lazy property와 함께 var (값이 변경가능한 변수)를 함께 사용할 때는 따로 주의를 기울이 필요가 있다.LearnPlan내의 level 프로퍼티는 var로 init 이후에도 값이 변경하다.
struct LearningPlan {
  // ... snip
  var level: Int
}
struct은 값 타입으로 struct 인스턴스를 변수에 할당시 참조값을 넘겨주는것이 아닌 인스턴스를 새로 복사해서 넘겨준다. 그러면 다음과 같이 생성한 struct 인스턴스를 다른 변수의 값으로 할당한 다음에 새로만든 변수의 level을 변경하면 lazy property는 어떻게 될까?
var intensePlan = LearningPlan(level: 138, description: "A special plan for // 1 today!") intensePlan.contents // 2 var easyPlan = intensePlan // 3 easyPlan.level = 0 // 4 // Quiz: What does this print? print(easyPlan.contents) // ?- struct의 인스턴스를 만들 었다. (아직 lazy property 값은 세팅되지 않은 상태)
- lazy property를 처음 get하면서 lazy property 연산이 실행되고 값이 저장되었다.
- 인스턴스를 다른 변수의 값으로 넘겨주었다. (값 타입이기 때문에 인스턴스를 복사해서 넘겨주었다.)
- 인스턴스를 넘겨 받아 level의 속성을 변경하였다.
contents는 lazy property로서 level을 바탕으로 연산을 해 값을 정하기 때문에 esayPlan의 level에 새로운 값을 할당한다는 것은 content 도 새로 세팅된 level에 맞추어 바뀌길 원했다는 것이다.
하지만 결과는 esayPlan.contents는 intensePlan.contents와 같은 lazy property 값을 갖게 된다.
왜냐하면 struct의 인스턴스가 다른 변수에 값으로 넘겨지기 전 lazy property 값 get을 먼저 했기 때문에 lazy property의 값이 이미 세팅되어있는 상태에 인스턴스가 넘어간다.
따라서 새로운 변수에 lazy propery는 이미 값이 저장되어서 변경이 불가능한 상태이기 때문에 level과는 맞지 않는 값이 나오게 되는 것이다.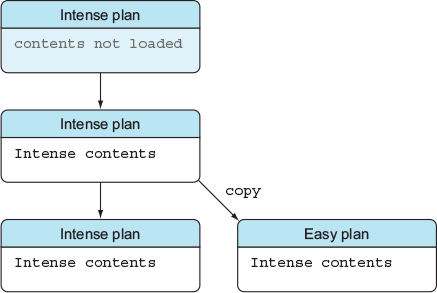

이렇게 lazy property와 lazy property 클로저가 연산시 사용하는 struct내 다른 프로퍼티와의 불일치를 예방하기 위해서
struct 인스턴스를 굳이 다른 변수에 할당하고 싶다면 lazy property에 아직 접근하지 않아 lazy property 값의 연산이 아직 이루어지지 않은 상태에서 넘기도록하자. 그러면 이후 level 같이 propety 변경이 생겨도 이에 맞춰 lazy property를 세팅할 수 있다.


var intensePlan = LearningPlan(level: 138, description: "A special plan for
     today!")
var easyPlan = intensePlan                //1
 easyPlan.level = 0

// Now both plans have proper contents.
print(intensePlan.contents) // Read two academic papers and translate them
     into your native language.
print(easyPlan.contents) // Watch an English documentary.
프로퍼티 옵저버를 이용해 저장 프로퍼티를 유기적으로 활용하자.
저장프로퍼티에 인스턴스에 필요한 값을 저장하면서 동시에 상황에 따라 유기적으로 저장된 값을 바꾸고 싶다면
Property Observer 사용을 고려해보자.Property observers란 저장 프로퍼티 값의 변경이 생겼을 때 이를 감지하고 원하는 동작의 수행을 가능하게 해준다. 따라서 저장 프로퍼티의 값이 설정된 이후 설정된 값을 정리하거나 속성이 변경된 것을 다른 부분에 알려야 할 때 주로 사용한다.
didSet : 해당 프로퍼티의 값이 바뀐 직후 동작을 수행
- 처음 객체 init시 SuperJeff에 공백이 첨가되어 있음 해당 저장 프로퍼티를 찍어보면 공백이 포함됨
- 이미 생성된 객체에 공백이 있는 SuperJeff를 다시 할당하면 didSet에 의해서 공백이 잘림
let jeff = Player(id: "1", name: "SuperJeff    ")
print(jeff.name) // "SuperJeff    "                1
print(jeff.name.count) // 13

jeff.name = "SuperJeff   "
print(jeff.name) // "SuperJeff"                    2
print(jeff.name.count) // 9
didSet을 활용하면 name 저장 프로퍼티에 값이 변경이 있을 때 일정한 동작을 수행할 수 있음
-> 새로 할당받은 name에 공백을 제거해서 저장 프로퍼티의 값에 할당을함import Foundation class Player { let id: String var name: String { didSet { print("My previous name was \(oldValue)") name = name.trimmingCharacters(in: .whitespaces) } } init(id: String, name: String) { self.id = id self.name = name } }이왕 공백을 제거해주는 거 처음에 값이 세팅될 때 부터 공백을 제거해서 세팅해주면 더 좋을 텐데 안타깝게도
Property Observer는 initializers에는 작동하지 않는다.
따라서 init을 통해 초기값이 세팅된 이후 저장 프로퍼티 값의 변경이 있을 때 Property Observer가 작동한다.Property observer를 defer과 함께 이용하면 된다.
초기화는 property observer의 trigger가 되지 않아 저장 프로퍼티에 직접 한번더 set 해주어 didSet을 작동시키는 것은 매우 귀찮다.
defer를 이용하면 이렇게 한번 더 직접 저장 프로퍼티를 찍어줘야하는 것을 피할 수 있다.
defer은 다른 함수 내에 사용할 수 있는 클로저로서 자신이 포함된 함수가 종료되자마자 호출된다.
class Player {

     // ... snip

    init(id: String, name: String) {
        defer { self.name = name }
        self.id = id
        self.name = name
     }
}
-> init으로 객체가 생성되자마자 defer 클로저가 호출되고 name 값에 set을 하기 때문에 property observer가 작동하여 공백을 제거할 수 있다.
GitHub - tjeerdintveen/manning-swift-in-depth: Source code for Manning's book: Swift in depth
Source code for Manning's book: Swift in depth. Contribute to tjeerdintveen/manning-swift-in-depth development by creating an account on GitHub.
github.com
'Apple🍎 > Swift' 카테고리의 다른 글
Swift를 위한 람다 계산법 핵심 (0) 2025.02.25 고차함수 for Swift (0) 2025.02.25 클로저 종결판 (0) 2025.02.23 일급객체가 뭔데? (0) 2025.02.18 [Swift] Enum을 다양하게 활용해보자. (0) 2023.12.11